D-250 Pattern generator module
8 patterns x 8 variations x 2 banks = 128 patterns total. Patterns 1-6 are 16 beat, patterns 7&8 are 12 beat.
One bank (8patt x 8vari) is preset, second bank (8patt x 8vari) is user recordable.
For 3-output pattern generator with editable patterns check D-425 3-track.
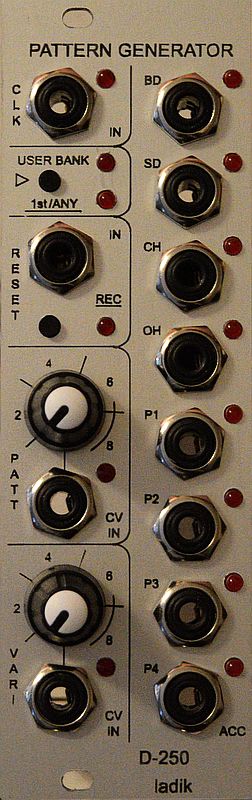
Left side:
– clock input jack
– button + 2LEDs (short=factory bank/user bank selection – LED glows if user bank is selected, long=sets change patt/vari on 1st beat only or on any beat – allows patterns mixing, rec step confirmation in rec mode)
– reset input jack
– reset/rec button + LED (short makes reset, long makes an record mode/quit of record mode)
– pattern selection knob + CV jack input (knob serves as CV attenuator if jack is plugged in)
– variation selection knob + CV jack input (knob serves as CV attenuator if jack is plugged in)
Right side:
– 8 output (or input in rec mode) jacks + LEDs
Settings:
– upper internal jumper (reset behavior): jumper set = reset input fires first pattern step itself (next clock makes second step), removed=internally prepares for reset and waits for clock to move to first step
– lower internal jumper (trig length): jumper set = 10ms trigger outputs, removed = 2ms trigger outputs
– holding upper button (bank-1/any) at power-up: gate or trig outputs (trig length 10/2ms depends on jumper setting), setting is memorized
– holding lower button (rec/reset) at power-up: changes reset input to work as “clock disable” = stays at current step while reset input is active (repeats current step with incoming clock), setting is memorized
– holding both buttons at power-up: factory reset (default settings = trig outputs, reset input = reset, user patterns rewrited to factory patterns)
Recording:
there are three ways to record your own patterns:
– manual (every step is confirmed/recorded by button)
– one pattern (currently recorded step is confirmed by clock input)
– all patterns at time (steps are confirmed by clock input)
Manual (step) recording (really oldschool):
– select pattern/vari you wish overwrite
– press and hold reset/rec (underlined text “REC” = hold button), rec/reset LED turns on. Now output jacks works as inputs 🙂 User bank will be selected automatically if currently is not set (user bank LED will goes on).
– connect an 5V signal (active gate) to mult, connect patch cables to right-side jacks and make required combination for first beat
– confirm this step by top button (w. small triangle)
– repatch cables for second step (remove all cables if no trig/gate should be recorded for second step), confirm this step by top button
– repeat previous for all 16 steps (patts 1-6) or 12 steps (patts 7&8)
– if all 16/12 steps are recorded REC LED goes out
This way you can record an “counting” for example easily: select required patt/vari, press and hold REC, connect 5V to first jack, confirm by top button, move patch cable to second jack, confirm by to button… To record an drum pattern you should prepare an drum pattern table on piece of paper
One pattern recording:
– select pattern/vari you wish overwrite
– press and hold reset/rec (underlined text “REC” = hold button), rec/reset LED turns on. Now output jacks works as inputs 🙂 User bank will be selected automatically if currently is not set (user bank LED will goes on)
– connect an clock signal to clock input, trig/gate signals to right side jacks
– input trig/gate combinations will be recorded at time when clock will come (think about preparing pattern in MIDI sequencer, MIDI clock and MIDI-to-trig or MIDI-to-gate module…)
– if all 16/12 steps are recorded REC LED goes out
Recording all patterns at time:
– press and hold reset/rec for more than 10s, rec/reset LED will blink rapidly. Now output jacks works as inputs 🙂 User bank will be selected automatically if currently is not set (user bank LED will goes on).
– connect an clock signal to clock input, trig/gate signals to right side jacks
– input trig/gate combinations will be recorded at time when clock will come (think about preparing pattern in MIDI sequencer, MIDI clock and MIDI-to-trig or MIDI-to-gate module…). Patterns are recorded in this order: p1v1, p1v2, p1v3,…,p1v8, p2v1, p2v2,…,p8v7, p8v8
– if all 960 steps are recorded REC LED goes out (6x 16-step patterns x 8 vari=768steps + 2x 12-steps patterns x 8 vari=192 steps. 768+192=960beats total). An MIDI clock source and MIDI-to trig (or MIDI-to-gate) module can be used, then you should prepare 960beat sequence in your MIDI seq (96 bars 4/4 + 24 bars 3/4 with sixteen 1/16 note grid and use 1/16 MIDI clock output)
Width: 8TE/ 8HP/ 40mm.
Depth: 45mm /1,8″ max.
Current: 20mA max. (from positive +12V supply only)
Handy 20cm (8″) power cable included.
Double check power connection before powering your system please.
„Red strip“ means -12V connector side in Eurorack standards.
In some power distribution systems connector key can be reverted. In this case cut connector key and plug power connector right way (with respect to red strip) or use different power cable appropriate to your power system.